The Making of This Website [part 1]
This is the first part of a series of blog posts where I talk about how I made this website. I discuss my design workflow and thought processes. I also try to be beginner friendly and talk about things that may be well known to individuals who have experience in website design.
!WARNING! The following paragraphs will be confusing if you’re browsing this website on a mobile device. This site is responsive and, thanks to media queries, simplifies, flattens and drops a ton of elements when viewed on a small screen.
Intro
I’m not a front-end developer, but I’ve made at least 8 websites over the years. Probably more. They were typically made as university assignments or for startups I joined.
Unfortunately, most of them are now defunct and I don’t have local backups. This especially applies to websites that were made for failed startups. Back then, I thought of them as “side tasks to my main tasks”. I worked on them simply because I could and not because I was good at making them. The motivation was simple - hiring more people or outsourcing would have strained the budgets even more and we couldn’t afford that. While it’s true that some of the sites I coded (the first ones) were barely serviceable, I regret not saving some of the later ones. They would have looked nicely in my portfolio.
Most websites I worked on were either designed by someone else or I was given very strict requirements. Right from the get-go, I realized I wanted something completely different for my personal site. Something that is NOT a slightly modified version of a theme you’ve seen a million times before. Something that is NOT an another boring example of simple, flat, “professional” looking, but cold and impersonal design. I wanted something that, just by looking at it, would say “THIS SITE WAS MADE BY MANVYDAS FUCKIN’ ŠLIAMKA”. And that is what I did. BOOYAH!!!
And then I made it look flat and simple on phones and smaller tablets with the help of CSS media queries. BOOHOO!!!
Survival of the fittest (or picking the right idea)
Let’s not get ahead of ourselves and start from the beginning. And all things begin with an idea. Or, to be more precise, ideas. Ideas that you carefully build up, refine and then… Then you make them fight TO THE DEATH for the right to become reality.
I guess this is well known to us creative types, but when making something, you should always create several ideas/sketches/whatever. At least in my experience, 4 times out of 10, I’ll end up going with the first one. However, in other cases, it may take me several (or even a couple dozen) tries to flush the bad ideas out of my head and come up with something worthwhile.
I guess, I’ll talk about coming up with actual ideas in some later post. For now, I only want to mention that even if I’m working on a personal project, I make a list of quickly verifiable requirements or goals. They help me focus on the task at hand and make it easier for me to come up with usable ideas. In this particular case, I opened a text editor and wrote down these four simple requirements:
- The site has to have an unusual design that would differentiate it from other sites.
- The site has to reflect my personality, likes and/or skills through colors and visual elements.
- The site needs to be responsive.
- The site has to be light. I don’t want to depend on tons of third party libraries and I want it to load quickly.
After that, I started making really rough sketches. I can draw better than this, but in this stage, I don’t care about details, crisp lines or colors. I want to quickly see the general look and shapes. By the way, I usually use a pencil, but this time I couldn’t force myself to get up and get it. Thank dumbbell lunges 😄.
Let’s examine my sketches one by one. You may click the images to view a full resolution version.
Cogs

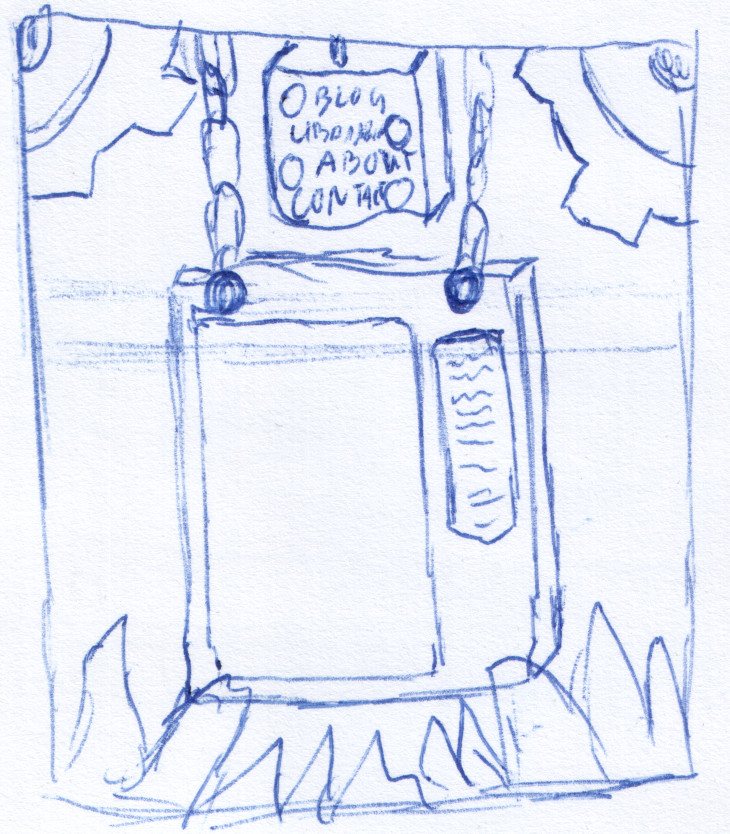
The Vending Machine

The Cave

The Desk
Cables

The Desk (minimal variant)
Cogs was my first attempt and it shows. I drew a bulletin-board/screen thing suspended from massive cogs. However, I abandoned the idea almost immediately because it would have had tons of poorly utilized space, it didn’t actually reflect me or my interests and it was difficult to “place” in the real world.
What do I mean by “difficult to place”? Imagine it as a real bulletin board that people (supposedly) interact with all the time. Why is it hanging suspended on chains tied to massive cogs? Why is it hanging so low and so close to the grass? That didn’t make any sense. Logic and consistency are important. A lack of those things triggers our bullshit detectors and breaks the design immediately.
So, yeah, I knew that this particular idea was bad, but it wasn’t useless. I realized I wanted a skeuomorphic design. That is, I wanted an interface that would emulate some kind of a real (or fantastic) object. Consider this to be a belated fifth requirement. And yeah, I Googled the word “skeuomorphic” because I keep forgetting how to type it. At least this time I didn’t forget the word completely 😆.
The Vending Machine was next. As I’ve mentioned a ton of times before, I’m making a game in my free time. Well, OK, against my better judgment, I’m making a game engine and I’ll make a game in it eventually. I do have a particular visual style in mind for it. You see, I’m a sucker for high tech things (computers, cyborgs, smartphones) in Victorian (Steampunk) or Art Deco packages. Therefore, I decided to make a small quick sketch that would resemble the style and reflect my likes through it. That’s how Vending Machine was born and, man, it really, REALLY, REALLY sucked 😆.
I mean, with A TON of refinement, this sketch may eventually end up being a basis for a prop in my game, but it was not suitable for a website. I was still fixated on the Cogs idea and this served as an unsuccessful attempt to refine it. I “solved” the low hanging bulletin board problem by adding… a huge column that would have served as useless whitespace on the website. What’s worse, I would have had a scrolling thing (the content of the website) inside an another scrolling thing (the vending machine itself). Don’t ever do it. It never looks good.
Last but not least, I would have needed a ton of images for the background and other visual elements. That would have slowed the loading down to a crawl. I know that a thing called caching exists, but if the site loads extremely slowly on the first visit, it’s unlikely the visitor will ever return for a second one. Long story short, The Vending Machine was stupid. Let’s not waste more time and leave it at that.
The Cave. Fuck no 😠. I felt like I wasn’t even trying 😞. Remember when I said it may take a few tries to flush the bad ideas out? That’s what I was talking about.
I realized I needed to take a short break and reset my brain. Listening to a few songs without thinking about the task usually helps with that. Want to try it? Just find a playlist or an album you wish to listen to, hit play and then close your eyes. Sit comfortably and try to focus on the melody and the lyrics. Sometimes, when listening to something more energetic, you simply won’t be able to sit. In that case, walk or move with the music. Oh, and don’t forget to OPEN your eyes if you decide to walk. I’m saying this because I don’t want to be held responsible for any injuries. For as long as you don’t think about the task for several minutes, your brain should reset.
This particular time, I listened to Medusa, which is the latest album by Paradise Lost. They’re a well known gothic metal band from England. I particularly like this song 🤘.
After listening to a couple songs, I thought about going the metal route. Ultimately, I decided against it. Sure, the music I listen to is a big part of my identity, but I listen to other genres as well. Plus, I’m no musician. That was when I decided to turn back to my profession and try something computer themed.
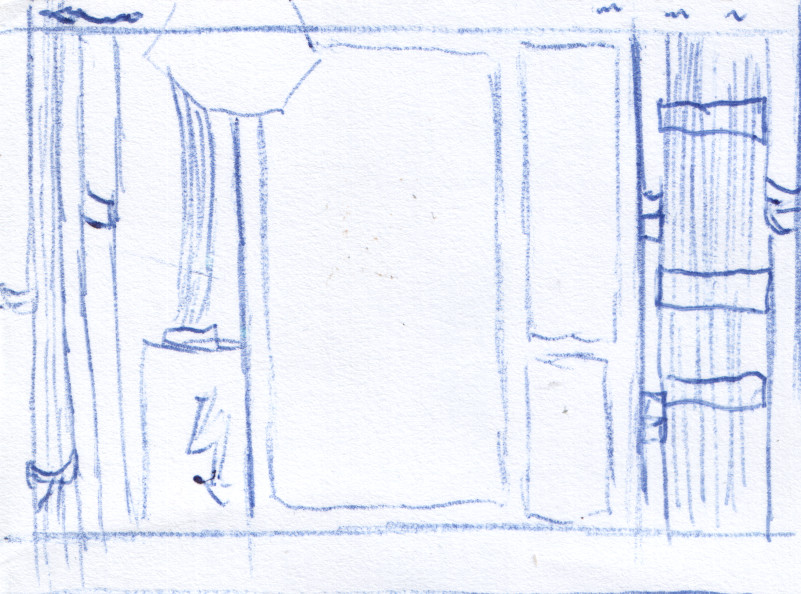
The Desk was my next sketch. As you can see, it’s the one I went with. Mostly. It went through a couple iterations that I’ll discuss later. The Desk felt perfect. It was fairly unusual looking, reflected my profession and I almost immediately started thinking about ways to make it more responsive by drawing The Desk (minimal variant). Moreover, the placement of objects in this layout looked logical. It features a fancy futuristic computer that’s simply placed on the desk. While it features a clearly fictional thing, it’s still skeuomorphic. By the way, in case you wonder, yeah, I checked how to spell that word. Again.
Cables was my last sketch. Well, technically, second to last because I drew The Desk (minimal variant) after that. The last original design would be more appropriate. I didn’t hate this one, but I still liked The Desk a lot better. I’m definitely a software guy and Cables invoked a hardware feel.
Three Dee (or planning the colors and layout in Blender)
Now, this step was a bit unusual. Normally, I draw a few more variants of the same design, scan everything and then quickly trace the main elements in Inkscape or GIMP. I use those programs to quickly try out different colors and object layouts before I actually start coding. However, like I said, this time was a bit different. Since the scene had to have a 3D look, I decided to open Blender and do my work there.
I quickly blocked out the initial shapes, placed them to roughly match the sketch and started picking colors. Picking the right ones is not an easy task. In case you didn’t know, colors convey a meaning and may invoke certain feelings. For example red invokes the feeling of passion and excitement, green is stability and growth, etc. You can find the full charts in many websites and books dedicated to graphic design. The descriptions may vary a little, but the general ideas stay the same. I had several colors in mind:
- Black. The color of elegance (nope, don’t have a bit of that 💩) and mystery. Mystery suits me. I’m an introvert who keeps a ton of things inside all the time. It takes a long time for people to actually start to know me and even then I can regularly surprise them. Plus, black is my favorite color.
- Purple. Darker shades of this color are often used to symbolize creativity.
- Blue. This color is often used to symbolize loyalty and intelligence. Darker shades tend to indicate trust and professionalism. That’s why you often see such shades on corporate sites. I think blue reflects my personality (and, sometimes, emotional state) quite well. It is also among my favorite colors.
Now, there are many ways to combine colors. They are called color harmonies and they can be used to build good looking color schemes. If you don’t know what those are and wish to learn more, the articles on Wikipedia can serve as a decent introduction. You should also play around with tools like this one to develop a natural feel for the harmonies.
At first, I thought about analogous colors. I wanted to use a dark shade of blue as the main color and a combination of dark purple and teal as secondary colors. Together with a black background, I would have ended up with all of my desired colors. However, the more I tried to make everything look good, the closer my shades got together and I ended up with a fairly monochromatic dark blue, black and white color scheme.
The following image shows how everything looked in the end.
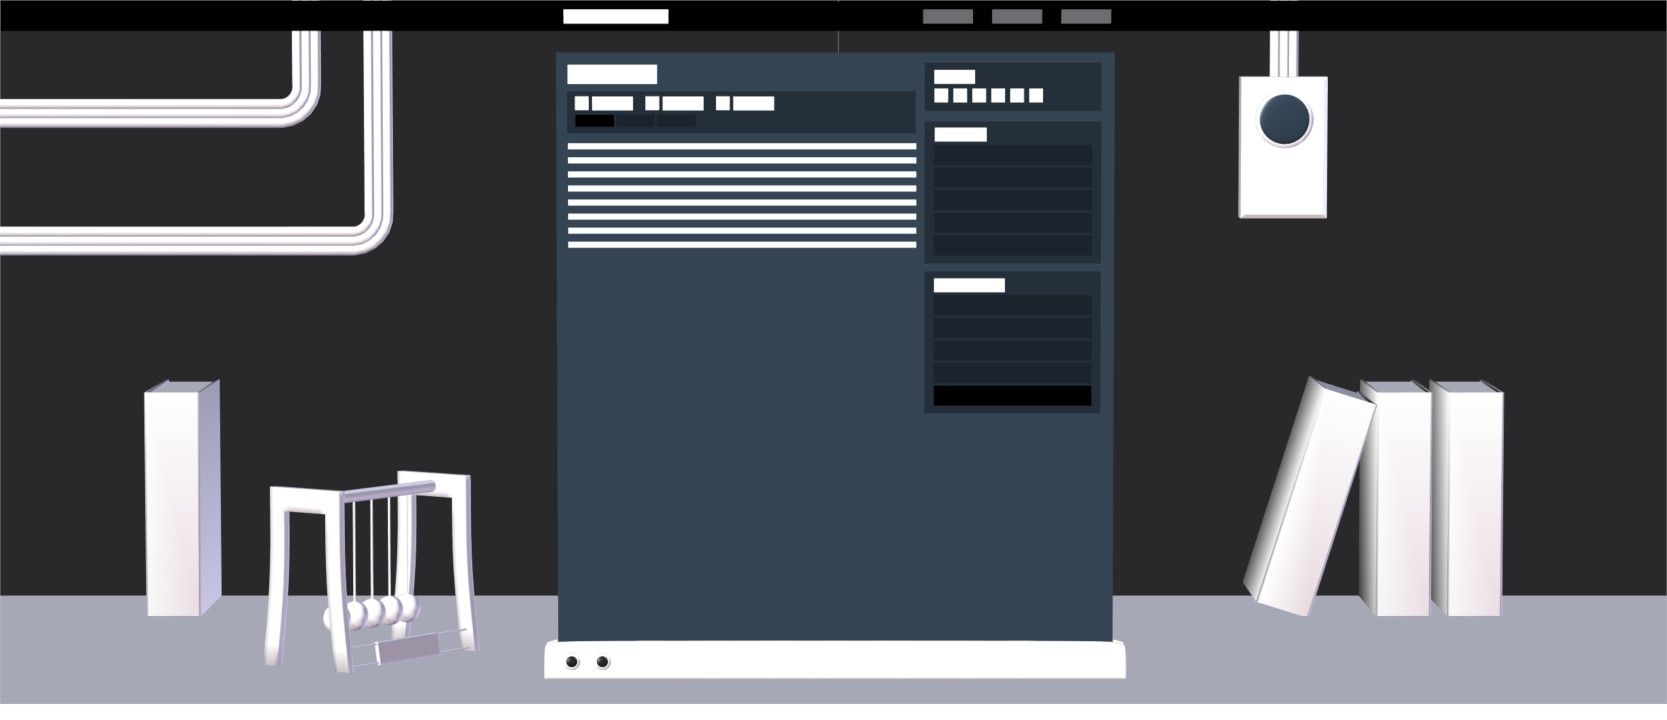
UI layout rendered with Blender's OpenGL renderer
The end result reminded me of the 3D view that Firefox used to have in the developer tools. Sad it got removed for the sake of e10s. While I mostly used it as a toy, it really helped me out a couple times.
Let’s not dwell on the past and return back to the website. Since I wanted it to look good on all screen resolutions, including really big ones, I needed to either use media queries and a ton of different size images OR vector graphics. I chose vector graphics. Instead of drawing everything from scratch, I decided to render the scene with the help of Cycles (Blender’s pathtracing renderer) and then trace the result in Inkscape by hand. Inkscape can do automatic tracking, but it is often suboptimal.
Before rendering, I moved the objects that represented various UI elements to a separate layer. This was done to avoid unnecessary shadows. Next, I added appropriate materials for Cycles to use. Finally, I crossed my fingers, hit F12 and waited. This is what I got.
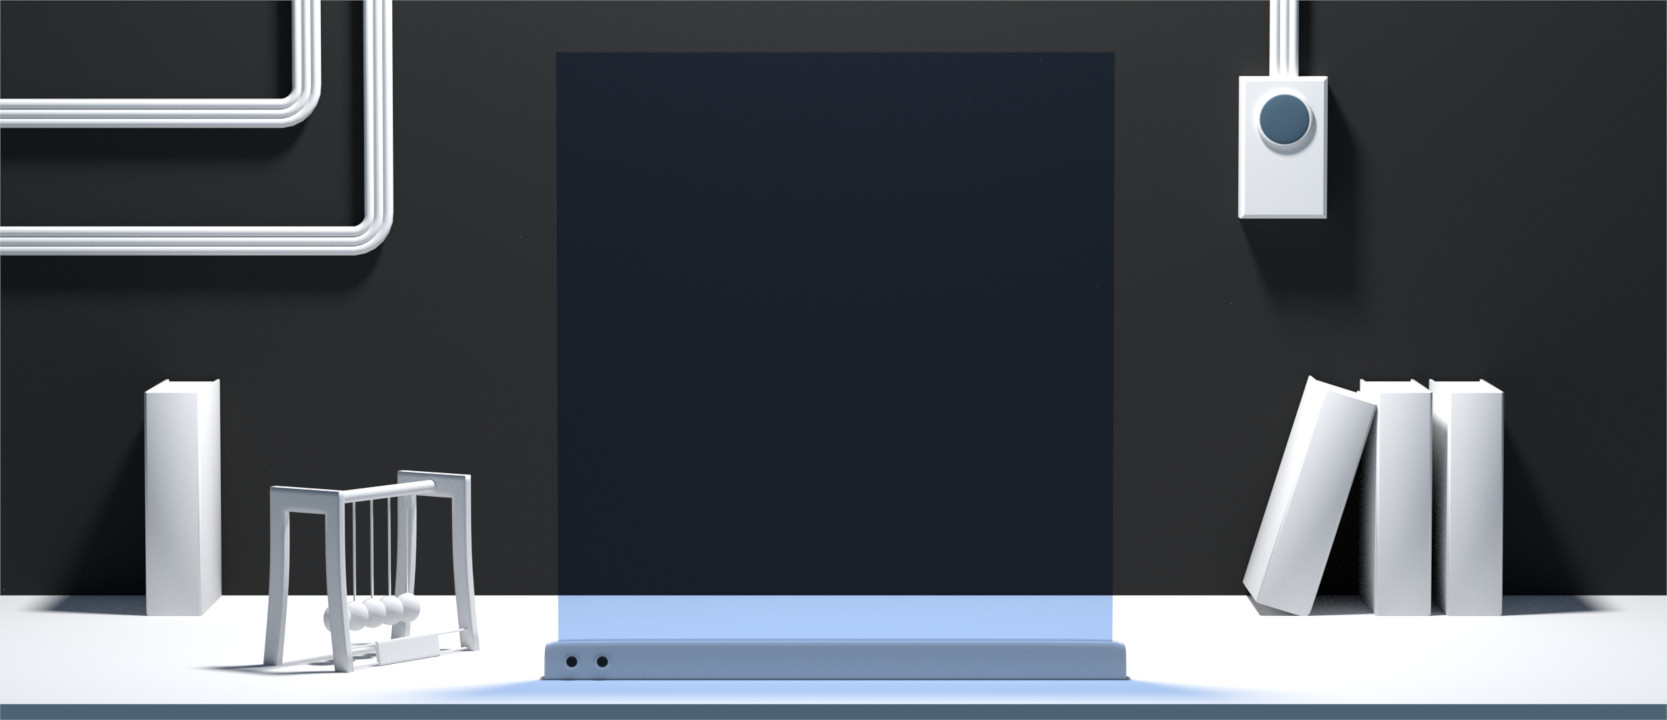
Image rendered with Cycles
You can download the final .blend file here.
I won’t discuss tracing the image in Inkscape. It was a simple, albeit a bit monotonous, task. Instead, let’s talk about the revisions that the design went through.
First of all, let’s discuss the top menu bar. If you look at the first rendered image, you’ll notice that the menu was fixed to the top of the view. I decided it was too traditional and, once again, not logical. That is, why is a menu hanging outside the screen controlling it? To solve that problem, I moved the menu into the virtual screen and… it… LOOKED… 🎆 AWESOME 🎆. Or, at least, much better.
Before I begin discussing the next change, I have to admit something 😢. I… I said that the design will reflect me, but… I lied a little 😭. You see, it depicts a clean and orderly desk. In reality, mine is an ever changing blob of chaos that no one but me can navigate 😀. However, I had to tone the clutter down even more. To me, the cables and the button gave a… basement feeling? I’m not sure how to call it. Having too many elements on the sides was also a bit distracting. They (especially the colored button) competed for attention with the main content. I tried to adjust the colors and shapes, but it just didn’t feel right and I decided to remove them.
Outtro
The last changes made the design look a bit more professional and subdued than I originally intended. However, especially when coupled with my informal and slightly silly writing style, I knew it would still feel sufficiently warm and personal. And that was before I even added the easter eggs. But that, together with a TON of other things I want to talk about, is a story for another time.


